How to Increase Memory in WordPress PHP.ini 2021

The uploaded file exceeds the upload_max_filesize directive in php.ini
You might be searching for result for the above error message and might be wondering how to increase memory in the php.ini WordPress website file. The following solution will help you fix the error within few minutes without waiting for the support team to answer you.
Basic Commands You Need To Know

Before setting up to increase memory in WordPress php.ini we need to know what are the code we are going to use and what their functions are
1) memory_limit
The maximum amount of memory a script may consume, remember that the value you give here should be greater than your file size. For example, say that it is your memory card or disk space limit.
2) max_execution_time
The execution time for each script. That is the time the server react to the file. For example, the time limit the server gate will be opened for your files to get into the server. If your file size is greater that cannot be uploaded in seconds then increase this
Sometimes this may also be one of the reason for getting the memory exhaust limit error and the server timed out message.
3) post_max_size
Maximum size of POST data that PHP will accept. To disable the limit set it as zero. The POST request is a method requests that a web server accept the data enclosed in the body of the request message
4) upload_max_filesize
Maximum allowed size in the server, this is the key for our increase memory in WordPress php.ini. You might have seen in your WordPress gallery that maximum upload size of the post or image.It defines the file size limit for a single file that you can upload to the server. It is one of the
It defines the file size limit for a single file that you can upload to the server. It is one of the method you can define to manage your space effectively on the server. This command will help you fix the memory limit exhaust problem in most cases.
Ways To Increase Memory in WordPress

Mostly the memory exhausted error is caused from the server side not by your theme or by your network speed. Of course, the latter two may also cause trouble but the scenario is very rare. Saying that in order to fix this server side error we need to get your website’s server access.
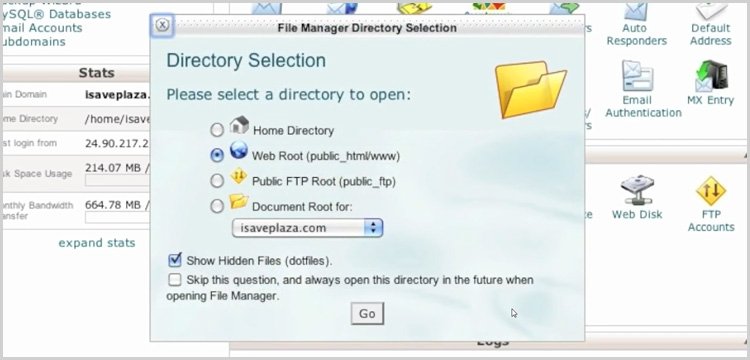
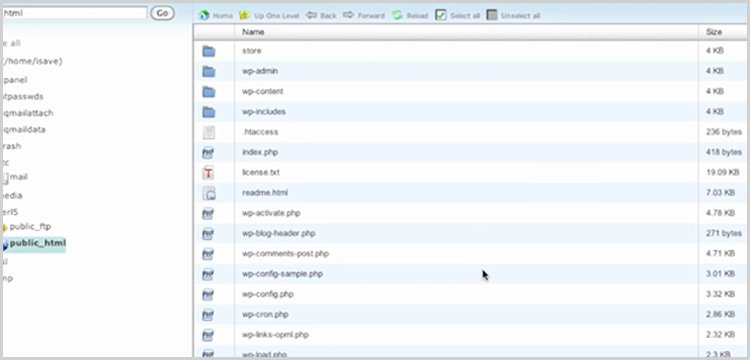
For that first you have to log into your cpanel or your server account. Locate the WordPress root directory that is the folder location where your WordPress is installed. Once you have reached there your WordPress directory will be like this.
From here you can increase your memory by various methods as follows
Create or Edit an existing PHP.ini file
Get into the wp-admin file and look for the php.ini or php5.ini. If there is one you have to edit it. If there is no such file in the wp-admin file then create a new folder named php.ini


After you have created the file copy the code below, paste it in the php.ini file and save it.
Pro Tip : all the values given are arbitrary value, change the values as per your need
upload_max_filesize = 720M
post_max_size = 64M
memory_limit = 1024M
max_execution_time = 180
If you are editing the existing php.ini file search for the term and change the value you need.
Pro Tip : to set the max post size without any limit use value 0 (zero)
This is the most common method you have to use to increase memory in WordPress php.ini
Note : Sometimes the hosting provider won’t let you have the access of the php.ini file or let the WordPress php.ini file to make any changes. If that is the case then we have to get the support from the server side only.
But still, you can try other methods mentioned below before reaching for the support.
htaccess Method
htaccess is the next predominant way used by people to increase the memory limit or maximize the file upload size. In the directory, you can find the .htaccess file get into the file and paste the code below.
php_value upload_max_filesize = 720M
php_value post_max_size = 64M
php_value memory_limit = 1024M
php_value max_execution_time = 180
Using wp-config.php file
The easiest method you can try and the probability of getting the issue fixed is also very low. Yet it is worth giving it a try. In your server search for wp-config.php file and paste the following code to increase the memory.
[code language=”PHP”]define( ‘WP_MEMORY_LIMIT’, ‘256M’ )[/code]
Theme Functions File
The upload size can be sometimes can be fixed right from your theme function file itself. Again the probability of fixing this method is less. Copy and paste the following code in your functions.php file
@ini_set( ‘upload_max_size’ , ‘720M’ );
@ini_set( ‘post_max_size’, ’64M’);
@ini_set( ‘max_execution_time’, ‘180’ );
In the Popular Hosting Providers
Let us see how to Increase Upload Max File Size in PHP.ini on different hosting providers like Godaddy, BlueHost, and SiteGround.
Godaddy – upload_max_filesize directive in php.ini.
 In Godaddy you can increase the max_file size limit by editing the user.ini file. Once you get into the cpanel find the user.ini file or create one for yourself in the WordPress root directory.
In the user.ini file paste the following code
memory_limit = 1024M
max_execution_time = 180
max_input_time = 180
post_max_size = 64M
upload_max_filesize = 720M
Pro Tip : max_input_time code is to maximize amount of time each script may spend parsing request data. It's a good idea to limit this time on productions servers in order to eliminate unexpectedly long running scripts.
BlueHost – upload_max_filesize directive in php.ini
 Login to your BlueHost cpanel, open the file manager and choose the WebRoot. On the right-hand side, you can see the php.ini file when you scroll. Right click on it and select the Code Edit.
Search for upload_max_filesize and give the value you need here it is 720M and the post_max_size as 64M that is
upload_max_filesize= 720M
post_max_size = 64M
SiteGround – upload_max_filesize directive in php.ini. 
SiteGround gives you two options to edit your php.ini file one is their PHP variables manager tool and other is we have to manually edit the php.ini file as we have seen before. The tool is really handy for the beginners. Let’s see how to maximize file upload size using the tool.
[image of the SiteGround tool]
To edit the php.ini file using the PHP Variables Manager tool login to your cpanel and find the manager tool. Select the directory where WordPress is installed and click ADD.
In that, you will find the variables and the php fields that is the codes I explained above. In the appropriate field change the value you want and save the changes. If you want the changes to be set for all the sub-directories check the “Apply changes to all sub-directories” check box.
Note : this option is only available for the Cloud and dedicated hosting plans. For the Shared hosting you need to get the server side tech support.
Ready To Increase Memory in WordPress Php.ini
These are the methods you can use to increase the memory that is, increase the PHP memory. As like SiteGround most of the hosting provider will set their own PHP limits globally for the shared hosting. We cannot increase PHP memory in such server manually by ourselves. For that, we need to ask for the hosting provider support.


