Install. Customize. Impress.
Our Themes brings your site to the next level.


Folder Structure
Let's talk about what's inside the downloaded package.
Once you purchased our theme you've to download All Files & Documentation zip file. Following folder structure is based on that zip file, in that zip file only you'll get all of our theme files including demo content & offline documentation folder.
-
Demo Data - this folder contains, demo data files. But you can install these files within One Click Installer steps.
- content.xml - it contains all of our live site contents
- slider-one.zip - revolution slider file one used in first home page
- slider-two.zip - revolution slider file two used in second home page
- Documentation - it contains offline documentation files, just simply what you're seeing now.
- Licensing - it contains envato and WordPress standard licensing information files
- kroth.zip - this is the right file to install in your WordPress admin.
- kroth-child.zip - this is just a child theme, if you want to edit any code files within theme, use this child theme. Don't edit any codes within parent theme.
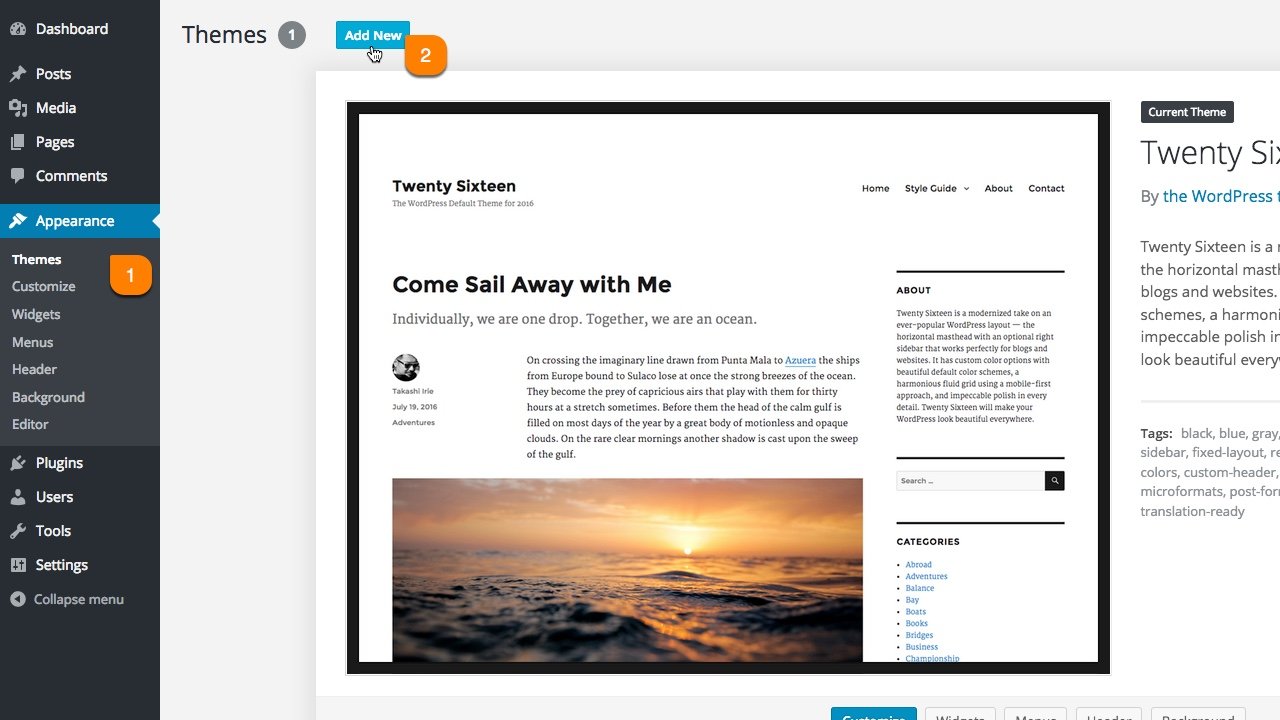
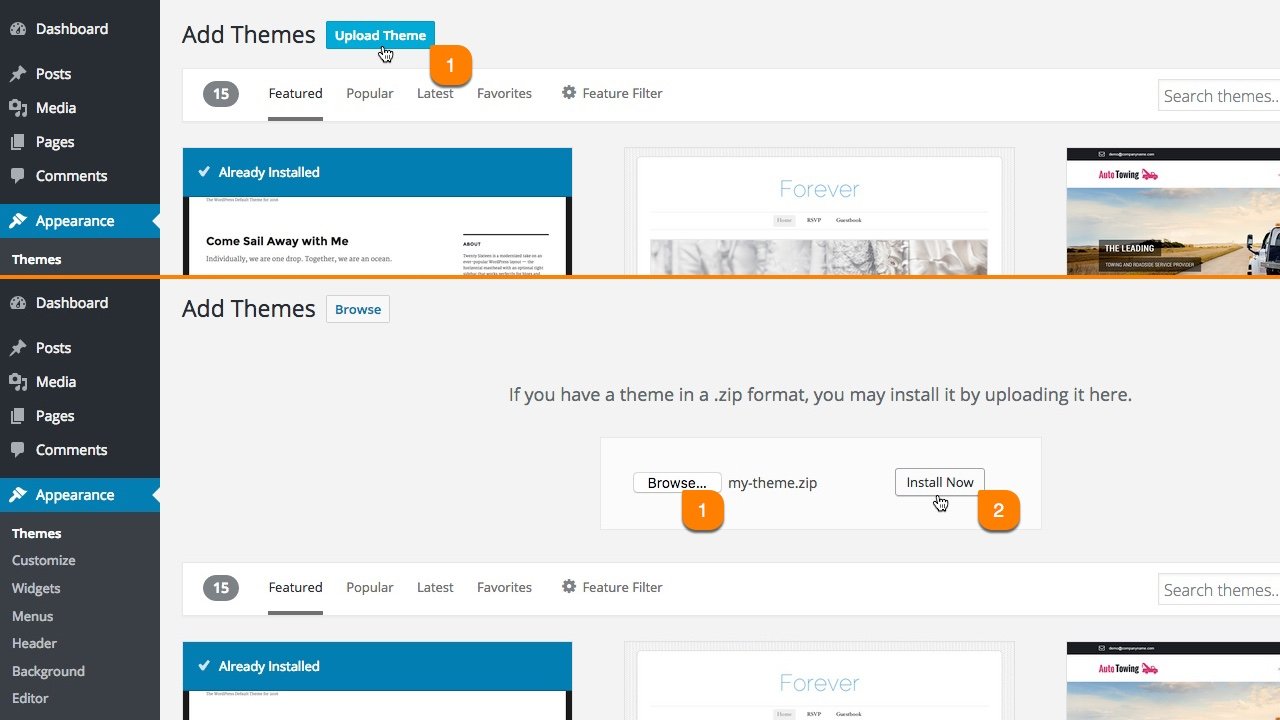
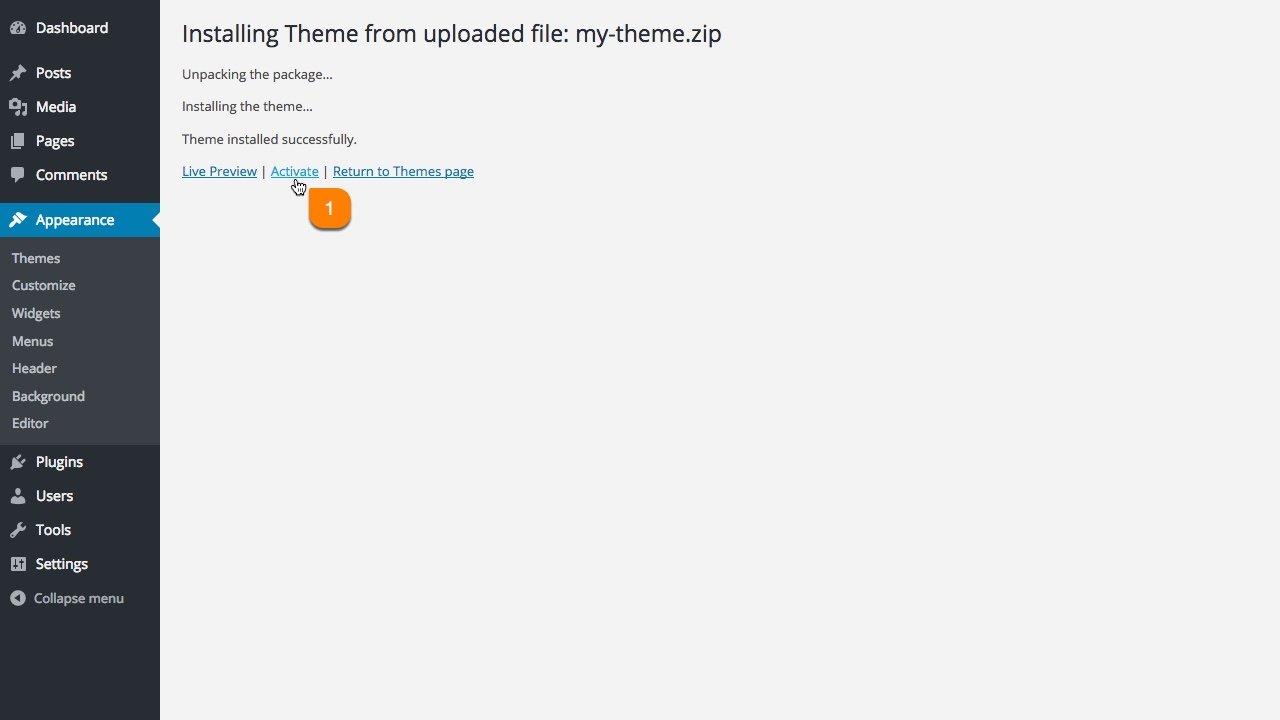
Install Theme
Upload the kroth.zip file.
The effective way to install our theme is just follow our video guide. Everything is strait forward to install our theme like a live demo experience within a few minutes.
Watch Video - Following 3 Steps[OR]
Follow The Simple Image Steps
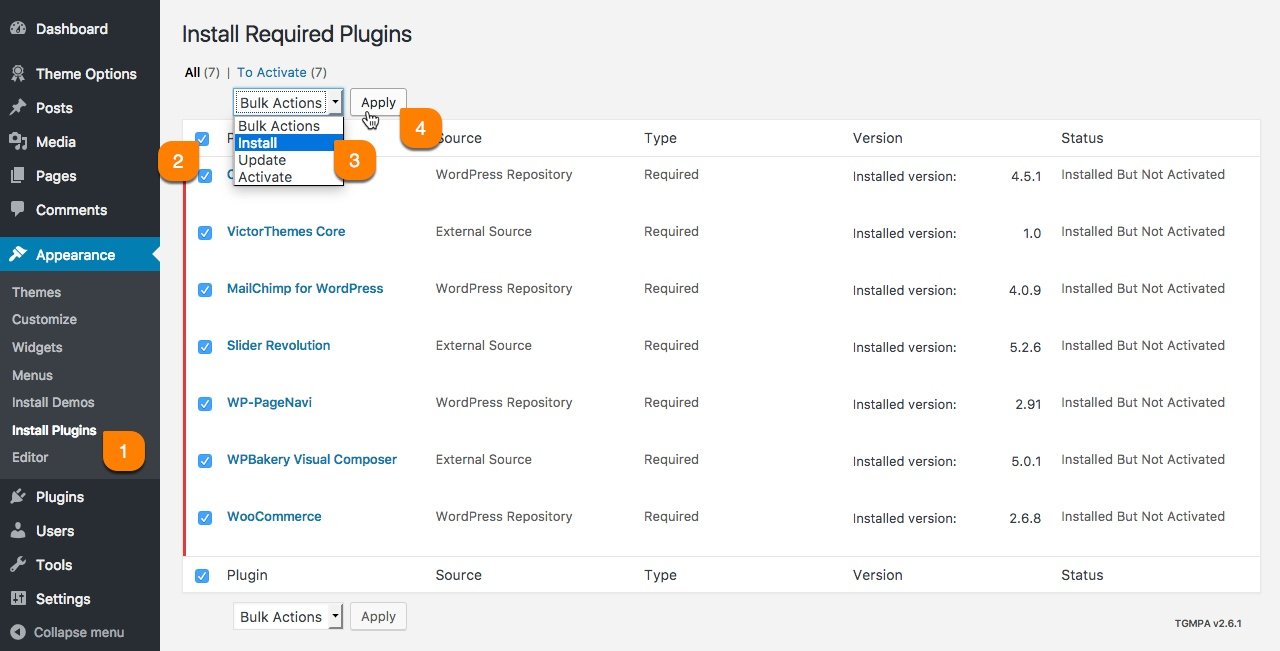
Install Plugins
Please select your needed plugins to Install and Activate.
Our live site demo content xml's have required plugins contents too. If you (miss or skip) this step and move on next step of One Click Installer then, you'll not get any plugin related contents and settings in your site. So, please (Install & Activate) your needed plugins first.
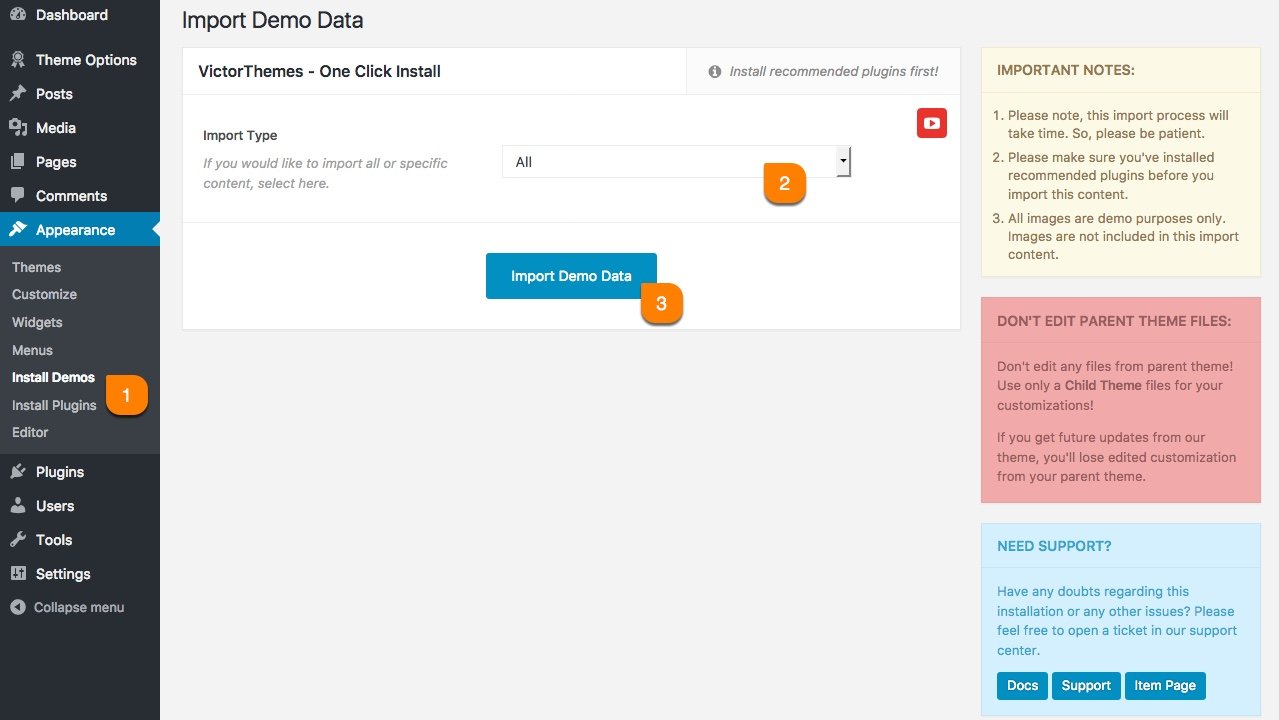
One Click Install
Simple & Effective!
In this step you'll get all live demo contents to your own site, that you're experienced with our live demo site. There is no more trick and no more surprise. You'll get all up and running website within few minutes of installation process.
Pages
Create your page from your Great Ideas!
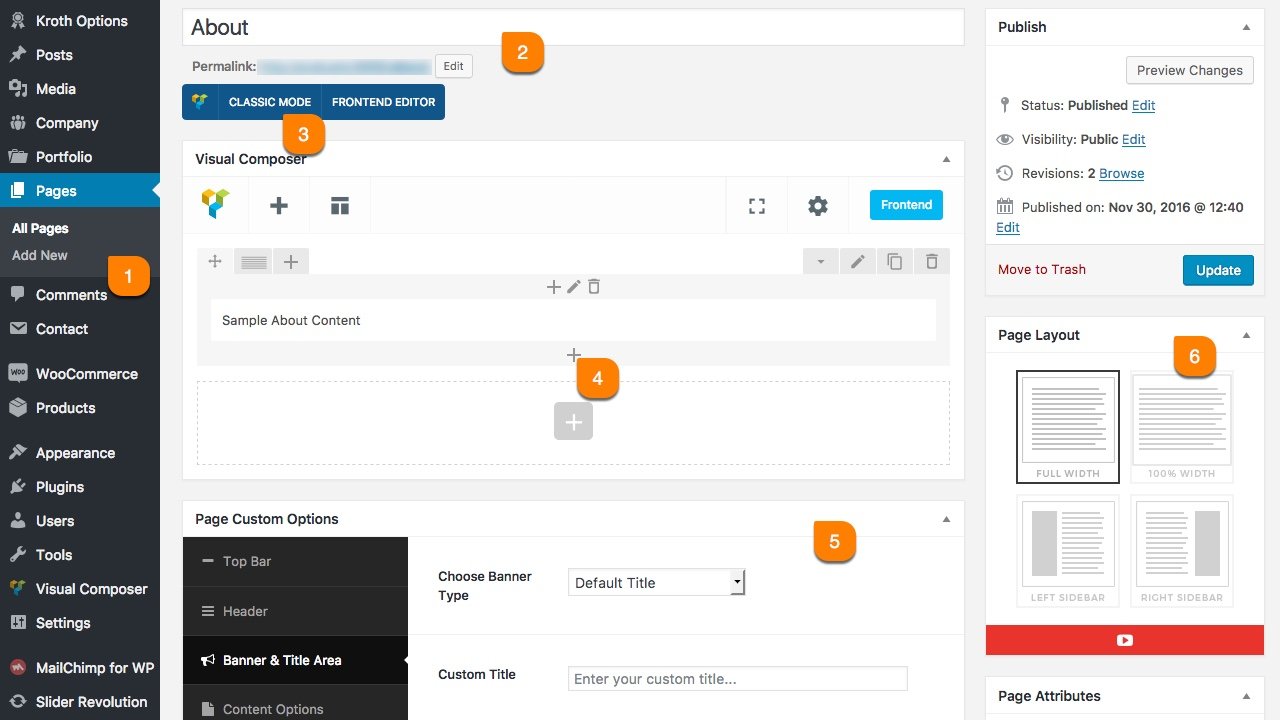
Creating & Customizing a page is really simple process. As you see in following screenshot example. Each area noted as numeric points. Each number have detailed explanation under the screenshot area.
-
1
Add New Page
The first step of creating a page is Pages > Add New. Pages are mostly related to explain your business static informations. And contents made by collection of shortcodes.
-
2
Page Title
Page title is most important in all manor. It's also a important for SEO purpose. So, please make sure you're entering right page title for that page purpose.
-
3
Page Builder
Our theme includes Visual Composer Page builder. Use Classic Mode to add shortcodes in backend. If you not see this, make sure to install & activate Visual Composer Plugin.
-
4
Add Shortcodes
You can add any shortcodes available via clicking that plus icon. Just simply watch this video first. Want to work like a pro? Click Here to watch video guides.
-
5
Page Custom Options
Page Option is most important about controlling page specific things apart from other common pages. You can control: Top bar, Header, Navigation, Title Area & Footer.
-
6
Page Layout
As you can see, 6th point in above screenshot. Everything is strait forward. Left & Right Sidebar have widget select option. You can select unique sidebar for this page.
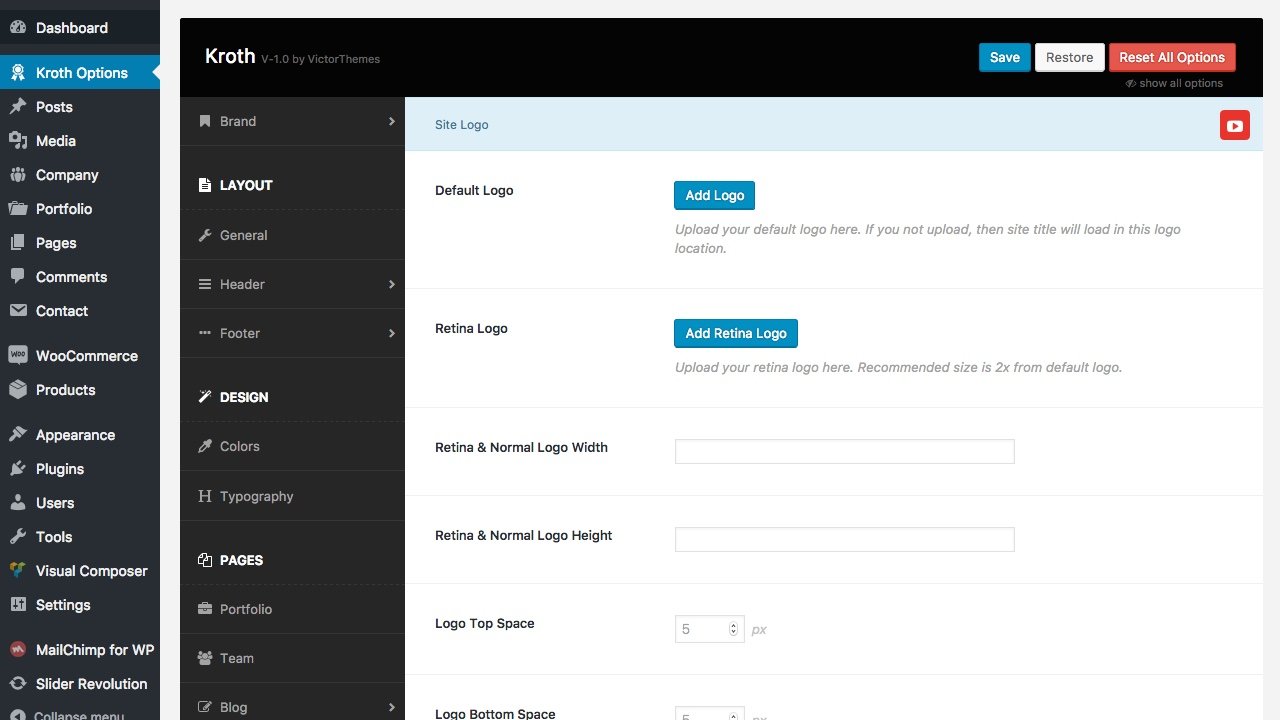
Theme Options
Global Approach, Changes Will Apply to the Entire Site!
What ever options you miss from above Page Options, pretty much everything you'll find here. These all options get affect in globally. Like: Logo, Fav Icon, Layout Options, Header, Footer & Etc. Some of sections you'll find top right YouTube icon, like below screenshot. It means, we've explained that section as a video format. So, you'll get clear understanding of how it's working and that section tricks.
Posts
Differentiate Posts from Post Types
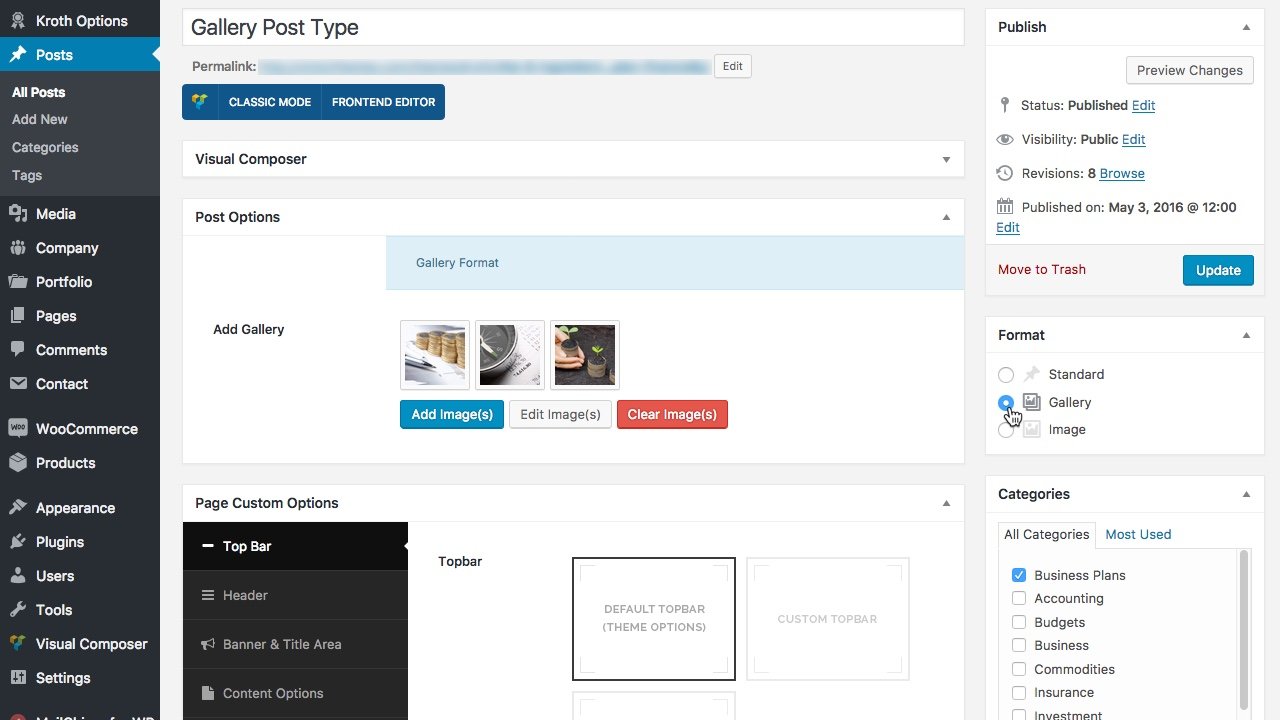
In our theme we've Standard, Image and Gallery post types. Standard and Image post types are mostly same, just need to upload featured image for Image post type. For Gallery post type, when you select it. You'll get new gallery upload field like in below screenshot. The Gallery images will show in as carousel method in list of posts and single post pages too. Even if you list all the xnxx porn on your first page you can still use all the pictures for all the videos.
Testimonials
Show your Clients Testimonials!
In our theme you'll get testimonials at : Company > Testimonials. You can call these testimonials list using Visual Composer - Testimonial Shortcode.
Not have this in WordPress menu?
If you not see this menu in your WordPress admin panel. Please make sure you've Installed & Activated Kroth Core plugin.
-
1
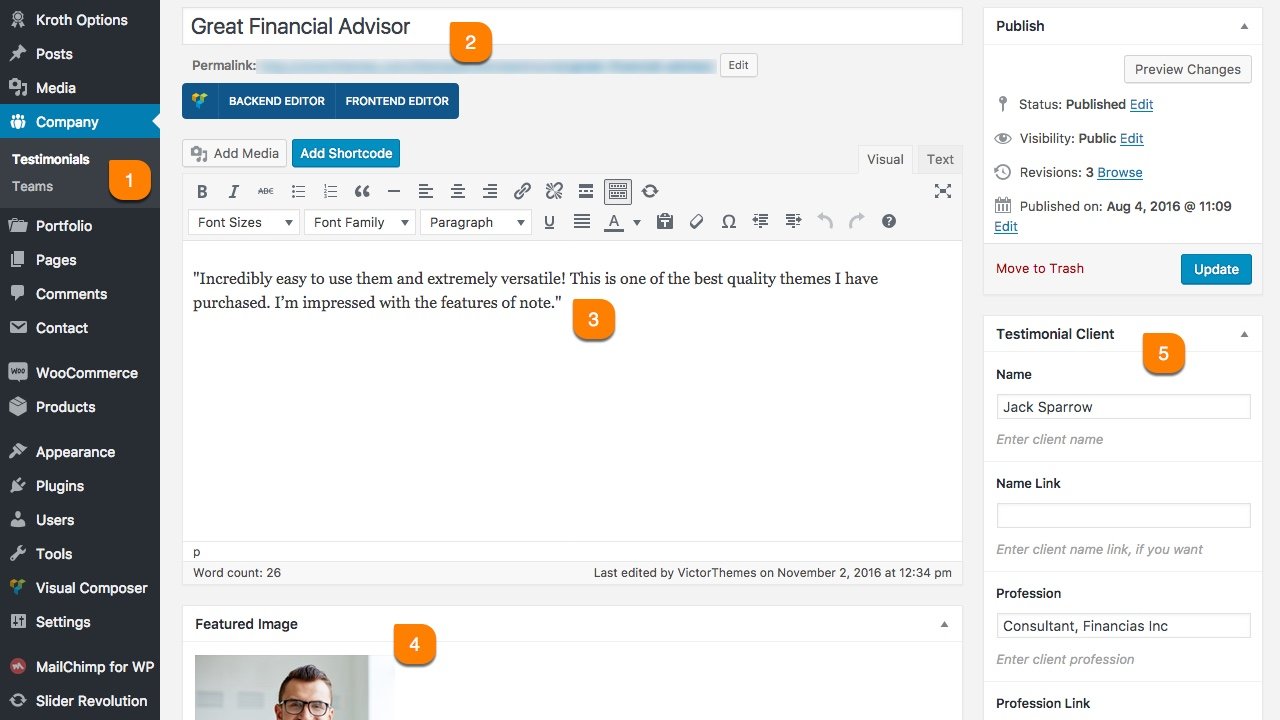
Company > Testimonials > Add New
All testimonial shortcode contents are managed from this location. Utilize the each fields in this area to show effectively in shortcode version. -
2
Title
This title will show in each testimonial item of shortcodes. So, utilize this title in every testimonials. Mostly it needs to explain the heading or clients short expressions about your service/product. -
3
Content
This is the exact location of your client testimonial content. Mostly three lines is recommended for better viewing as a shortcode element in all testimonial styles. -
4
Featured Image
Some of testimonial shortcode styles needs client image. So, upload you testimonial client image here. And recommended size is 200x200. But follow the right radio of width and height. -
5
Testimonial Client
In this box, you've to enter the client informations. Like, their name and profession. If you've name link and profession link, you can add that in link fields too.
Team
Show your A-Team!
In our theme you'll get Team at : Company > Team. You can call these teams list using Visual Composer - Team Shortcode.
Not have this in WordPress menu?
If you not see this menu in your WordPress admin panel. Please make sure you've Installed & Activated Kroth Core plugin.
-
1
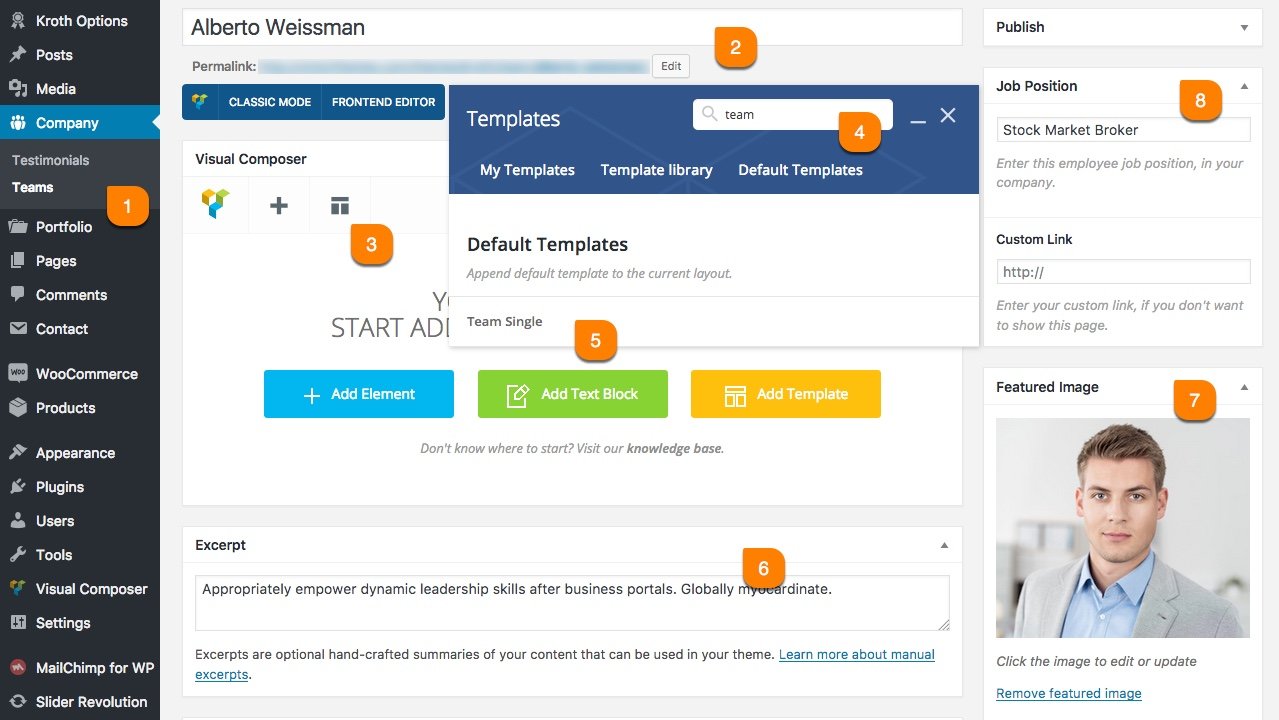
Company > Team > Add New
All team shortcode contents are managed from this location. Utilize the each fields in this area to show effectively in shortcode version. -
2
Title
The title of team member is = Team Member Name. So, enter your team member name in this title field. It's also easy to manage and see their names from out side lists. -
3
Visual Composer Template
Click that 3rd point link. You'll get poppup of templates. It's a pre-defined template only for team member single page design, as you see in our live demo site. -
4
Search Templates
Due to lots of pre-defined template available in our theme. It's really required your attention to choose right template in every time. So, utilize the search field to search team template.
-
5
Click That Template
Once you searched that template, you've to click that particular template that you want to use in that page. -
6
Excerpt
Enter your team excerpt. Some of our team shortcode styles, needs excerpt short content. So, enter the short content that shows in excerpt area. Only one line is recommended for best view. -
7
Featured Image
Our team shortcodes require image for each team members. So, upload your team member image in Featured Image section, in right image ratio. -
8
Job Position
Enter the team member job role in your company, in Job Position field. If you've any custom link for their job position text, enter that link in custom link field.
Portfolio
Show your Works in Effective Way!
In our theme you can add portfolios at : Portfolio > Add New. You can call these portfolio item lists using Visual Composer - Portfolio Shortcode.
Not have this in WordPress menu?
If you not see this menu in your WordPress admin panel. Please make sure you've Installed & Activated Kroth Core plugin.
-
1
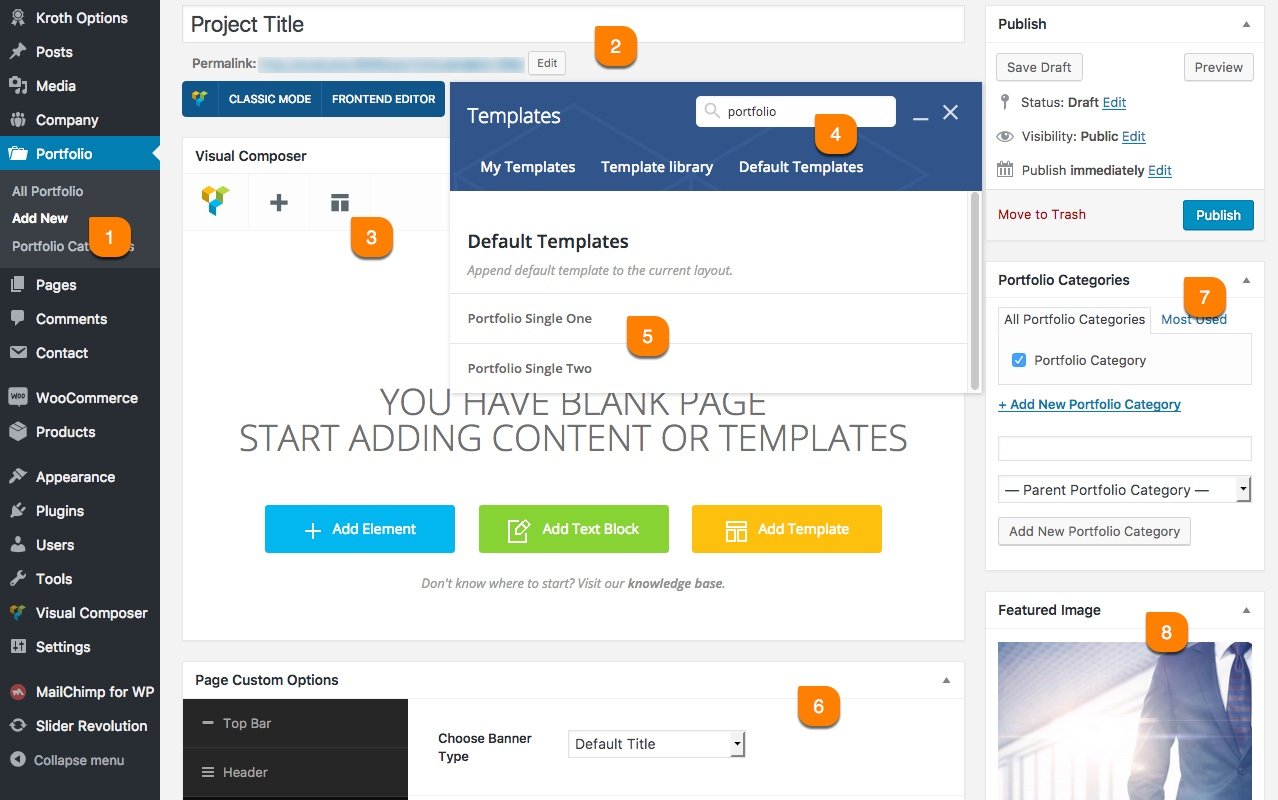
Portfolio > Add New
All portfolio shortcode contents are managed from this location. Utilize the each fields in this area to show your works effectively in shortcode version. -
2
Title
This title will show in each and every portfolio item in portfolio shortcode styles. So, utilize this title in every portfolio items. -
3
Visual Composer Template
Click that 3rd point link. You'll get poppup of templates. It has a pre-defined template collections, to make your work so easy. Find the template that fits for your needs. -
4
Search Templates
Due to lots of pre-defined templates available. It's really required your attention to choose the right template in every time. So, utilize the search field to search portfolio templates.
-
5
Click That Template
Once you searched that template, you've to click that particular template that you want to use in this page. -
6
Page Custom Options
This is most likely page options as you saw in Page Options section in this documentation. You can use any specific this page related changes in this area. Know More. -
7
Portfolio Categories
Our theme have functionality of filtering portfolio items using their categories. So, at-least you've to choose one right category for that portfolio. -
8
Featured Image
Our portfolio shortcodes require image for each portfolio items. So, upload your portfolio item image in Featured Image section, in right image ratio.
Here's the full list of portfolio styles and columns that needs right image size. So, please upload more than mentioned image size in this table. Following size limits will hard crop your uploaded image, due to focusing on perfect output results.
| Column | Image Size |
|---|---|
| 2 Columns | No Size Limit. |
| 3 Columns | 420x280 |
| 4 Columns | 280x190 |
| 5 Columns | 220x150 |
WooCommerce
Sell your Products Now!
Our theme is officially supports WooCommerce plugin. There is no changes made in backend functions. So, you can use WooCommerce in that native way. Only outer look of your shop will change based on our theme design style.
Not have this in WordPress menu?
If you not see this menu in your WordPress admin panel. Please make sure you've Installed & Activated WooCommerce plugin.
The detailed documentation for Woocommerce Plugin is available in online(link found below). For any details or interactions about the Plugin features, please refer to that documentation. Due to our theme strictly followed WooCommerce native way, there is no point to mention in our theme documentation about WooCommerce plugin. So, please follow their official documentation.
Here's the list of product image type and image sizes. So, upload images more than Single Product Image size in this table. Goto WooCommerce > Settings > Products > Display > Product Images and mention the sizes for the image represent type and click Save. Then, install Regenerate Thumbnails plugin. After activate that plugin, please regenarate all images at Tools > Regn.Thumbnails.
If the Image sizes are already mentioned in WooCommerce > Settings > Products > Display > Product Images then no need to take any action. But, you still see images are blurred and different sizes comparing our live demo site means, please do the Regenerate Thumbnails process.
| Image Type | Image Size |
|---|---|
| Catalog Images | 280x300 |
| Single Product Images | 440x500 |
| Product Thumbnail | 75x80 |
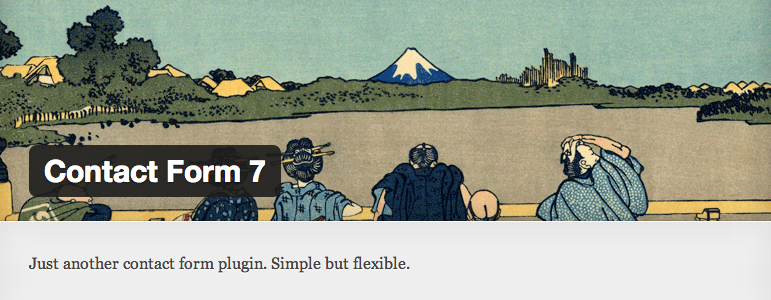
Contact Form 7
Make sure you're reachable!
We've used in our live demo site contact forms are from Contact Form 7 plugin. You can just install Contact Form 7 as normal plugin. And start using it in that native way. No more surprise or tricks.
Not have this in WordPress menu?
If you not see this menu in your WordPress admin panel. Please make sure you've Installed & Activated Contact Form 7 plugin.
The detailed documentation for Contact Form 7 is available in online(link found below). For any details or interactions about the Plugin features, please refer to that documentation. Due to our theme strictly followed Contact Form 7 native way, there is no point to mention in our theme documentation about Contact Form 7 plugin. So, please follow their official documentation.
I would like to discuss:
[select menu-813 "Select One" "Select Two" "Select Three"]

Your Name
[text your-name]

Your Email
[email* your-email]

[submit "Submit Now"]Two would like to discuss:
[select menu-813 "Select One" "Select Two" "Select Three"]
Your Name
[text your-name]
Your Email
[email* your-email]
[submit "Submit Now"]Widgets
Widgets are not only Collection of Links. It's a User Friendly Feature.
In below tabs we've explained about each and every widgets and that role of working.
Default Widgets
Below list will explain the each widgets role.
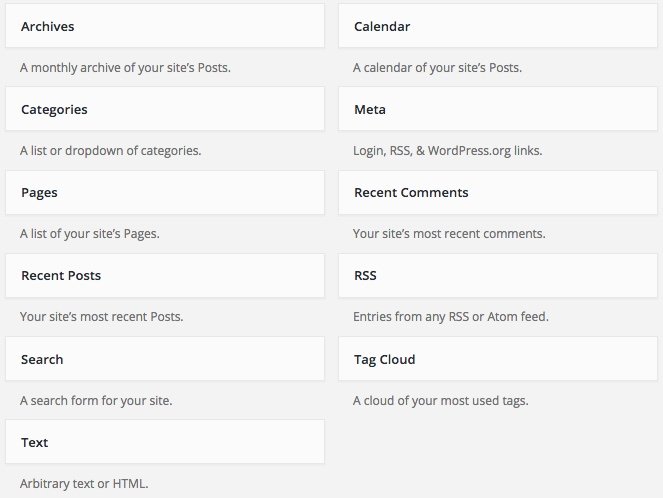
| Name | Role |
|---|---|
| Archives | Show months list, based on posts added time. |
| Calender | Display like a calender, and date have links. If you added any posts in that date. |
| Categories | Display posts categories. In List and Select format. |
| Meta | Meta links like, login and logout, etc. |
| Pages | List of pages you added. |
| Recent Comments | Recent comments from posts. |
| Recent Posts | Recent posts from date ascending order. |
| RSS | Your site feed lists. Rich Site Summary. |
| Search | It's just show search form. |
| Tag Cloud | Tag links based on your posts added. |
| Text | Most simple widget. Title and Content. |
Custom Widgets
Below list will explain the each widgets role.
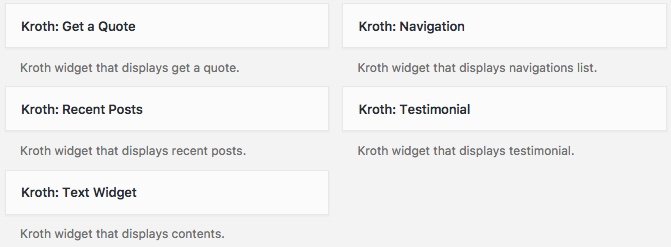
| Name | Role |
|---|---|
| Get a Quote | It've title, content, button. Simply like a call to action. |
| Navigation | Shows selected navigation lists. Work like a side menu. |
| Recent Posts | It's a custom recent posts widget. Designed based on our theme. |
| Testimonials | Shows simple testimonial design. Only one. |
| Text Widget | Custom text widget. Ability to add Shortcodes. |
WooCommerce Widgets
Below list will explain the each widgets role.
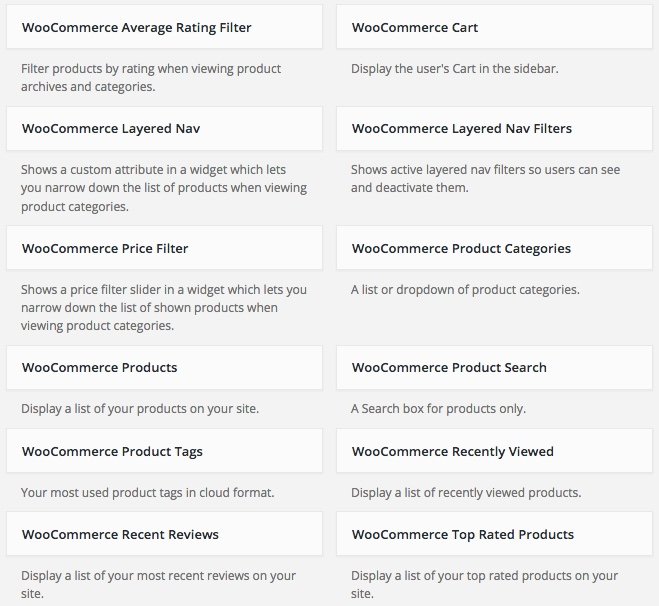
| Name | Role |
|---|---|
| Average Rating Filter | You can filter products based on that ratings. |
| Cart | Live cart update. Shows your added products. |
| Layered Nav | Shows custom added filter. You can filter based on that link. |
| Layered Nav Filter | Just like above, but it shows active filters only. |
| Price Filter | It's a draggable price filter to manage low and high price easily. |
| Product Categories | It's just like post categories widget, but it's for products. |
| Products | Just shows products. Have extra options for listing in this widget. |
| Product Search | Products Search Form. |
| Product Tags | Tag links based on your products added. |
| Recently Viewed | It'll list the recently viewed products by that user. |
| Recent Reviews | List of products that's are recently rated. |
| Top Rated Products | Shows the list of products that's are get top rated. |
Shortcodes
Impress Everyone by Using Shortcodes!
In our theme we've used visual composer user friendly features to the next level. We've used some custom interaction methods to extend the usage of our shortcodes effectively without boring. All of our custom shortcodes listed under Kroth filter like in below screenshot.
Not have this option like in below screenshot?
If you not see this option like in below screenshot. Please make sure you've Installed & Activated Kroth Core plugin.
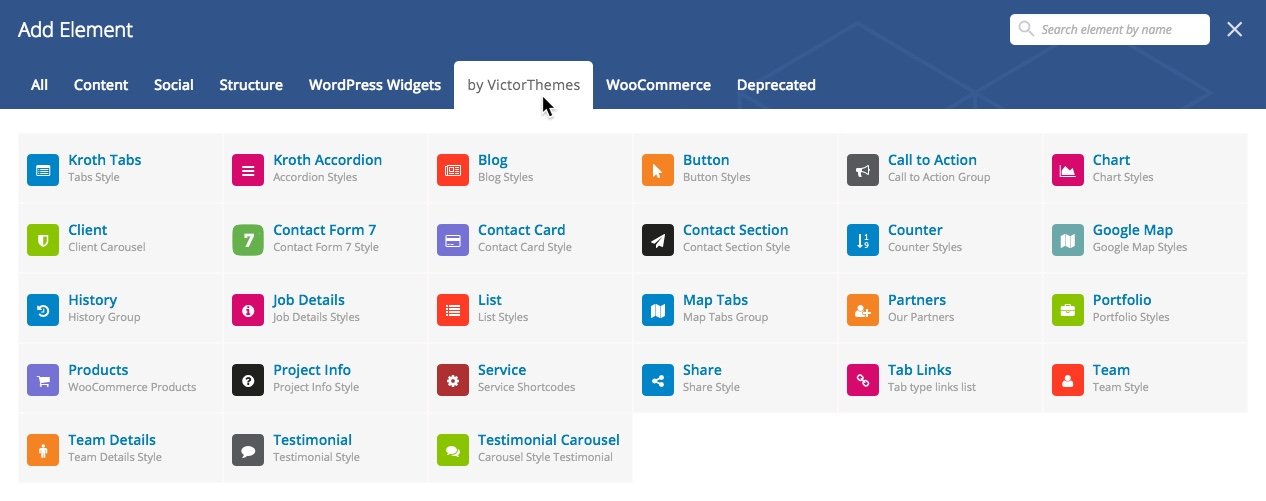
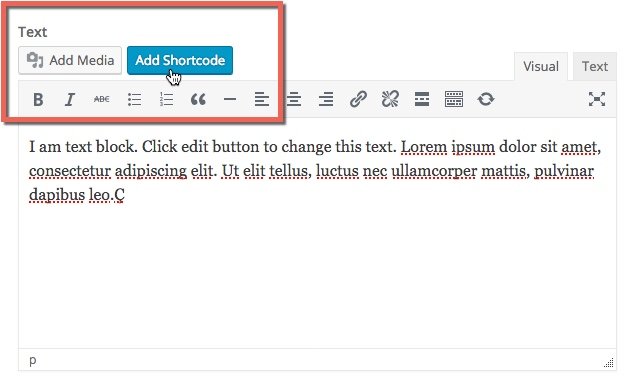
You'll also get little shortcodes from Add Shortcode button in all content editors.
MailChimp
Communicate with all your Customers at Once!
We've used in our live demo site subscribe forms using MailChimp plugin. You can just install MailChimp plugin as a normal plugin. And start using it in that native way.
Not have this in WordPress menu?
If you not see this menu in your WordPress admin panel. Please make sure you've Installed & Activated MailChimp for WordPress plugin.

The detailed documentation for MailChimp is available in online(link found below). For any details or interactions about the Plugin features, please refer to that documentation. Due to our theme strictly followed MailChimp native way, there is no point to mention in our theme documentation about MailChimp plugin. So, please follow their official documentation.
Use below code in : MailChimp for WP > Forms. Create New.
<p>
	<input name="EMAIL" placeholder="Email Address" required="" type="email">
	<input value="Go!" type="submit">
</p>
Slider Revolution
Promote your Products/Services to the Next Level!
Our theme includes Slider Revolution plugin. This is totally free to use within our theme. No need to buy separate license for it. You can import our exact live demo sliders.
Goto : Slider Revolution > Import Slider.
You'll get our demo sliders importable zip files at your downloaded package : Demo Data folder. Click here to see Folder Structure.
Not have this in WordPress menu?
If you not see this menu in your WordPress admin panel. Please make sure you've Installed & Activated Slider Revolution plugin.

The detailed documentation for Slider Revolution plugin is available in online(link found below). For any details or interactions about the Plugin features, please refer to that documentation. Due to our theme strictly followed Slider Revolution native way, there is no point to mention in our theme documentation about Slider Revolution plugin. So, please follow their official documentation.
FAQ
Frequently Asked Questions!
-
While installing my theme it shows Stylesheet Missing?
A common issue that can occur when installing a WordPress themes is "The package could not be installed. The theme is missing the style.css stylesheet". Error message being displayed when uploading or activating the theme.
Mostly it's because of, you've uploaded wrong zip file. Themeforest provides, 1. All files & Documentation & 2. Installable WordPress file only. The second files is the exact file to upload in your WordPress dashboard. Or take a look folder structure.
For more details Click here.
-
How do I update my theme ?
The update process is similar to the installation process. In WordPress Dashboard, Kroth Options there is a section of Envato Account in this area you've enter your envato username and API key then Save the changes, You'll get our theme updation right into your WordPress Dashboard > Updates.
For more details Click here
Note : We hope you not edited any thing inside of our theme core files. If you edit anything in our theme, this step will replace our original theme code, so you'll loss your past edited files in our theme. Editing theme core files is not recommended.
-
How to update premium plugins, that included with your themes?
In most cases, premium plugins bundled with theme, are not get updates quickly. It depends on theme update. But, in our all themes you can get updation of premium plugins by following simple steps.
- Goto : Plugins > Deactivate & Delete that plugin.
- Then Goto : Appearance > Install Plugins.
- Then : Install and Activate that plugin.
For more details Click here
-
How to get live demo site content?
To get live demo content we have one click install option in theme Appearance. To see how to get live demo content in one click Click here.
-
How do I customize my theme?
All of the theme related customization settings are located in Kroth Options, in sidemenu of WordPress dashboard. Which will allow you to easily customize your website.
Lots of options neatly organized into sections that allows you to build website without any coding knowledge. Please take some time and navigate through each option tab, most things are self explained. Go to Kroth Options to start. Don’t forget to click on Save All Changes to save your settings once you are finished.
For more details : Click here
-
How do i get support?
If you want support from us please Submit your Support ticket at our Support Center, before you submitting the ticket please read our support terms.
Read our support terms : Click here
-
Do you available for customization works?
We cannot offer you an extensive help in terms of modifications. Our support deals with installation of the theme, issues comes from our theme itself Bug Fixes, and Small Modifications which means, one or two lines of code we'll provide if needed.